Happy New Year! Here's to a calmer and saner year!
Displaying HTML pages inside a spreadsheet is quite common and useful when you do automation stuff. The HTML resides inside a popup that we can easily show when the user clicks on a button or selects from a custom menu. The HTML inside a popup supports CSS and Javascript, so you can offer really beautiful and useful HTML experiences inside a spreadsheet.
Today, we will look at HTML popups in the context of mail merge. I've written about this solution here, here, and here. The mail merge has the ability to send email campaigns based on a user-specified template. But a crucial feature we need to add is the ability to preview the emails before sending them. We can use a popup to achieve that. The popup has a "Previous" and "Next" buttons that let the user iterate through the recipients and preview their intended emails. The window shows the recipient's email address, subject line, HTML body, and plain-text body.
In Google Apps Script, let's create two files: popup.gs and preview.html. The first will house our server-side code that Apps Script will use to create the popup. The second file will be used to render the HTML inside the spreadsheet and enable the user to interact with it.
Sounds good, you say? Well, then, let's proceed. First we create the HTML markup:
<html lang="en">
  <head>
    <meta charset="UTF-8" />
    <meta http-equiv="X-UA-Compatible" content="IE=edge" />
    <meta name="viewport" content="width=device-width, initial-scale=1.0" />
    <title>Preview email</title>
  </head>
  <body>
    <div id="buttons">
      <button id="previous">◀ Previous</button>
      <button id="next">Next ▶︎</button>
    </div>
    <div class="double">
      <h5>To</h5>
      <div id="to"></div>
    </div>
    <div class="double">
      <h5>Subject</h5>
      <div id="subject"></div>
    </div>

    <div>
      <h5>HTML body</h5>
      <div id="html-body"></div>
    </div>
    <div>
      <h5>Plain-text body</h5>
      <div id="plain-text-body"></div>
    </div>
  </body>
</html>
Pretty straightforward affair. Inside the body we declare a buttons div that will hold our navigation buttons. We id the buttons so that we can attach event listeners to them. We also have areas for our email address, subject line, HTML body, and plain-text body. These have ids as well so that we can inject the email content to them.
With the HTML markup set up, we can write the server-side code to render the popup. Open the popup.gs file in Apps Script, and enter the following code:
function previewEmails() {
  const htmlTemplate = HtmlService.createTemplateFromFile('preview.html');
  const htmlOutput = htmlTemplate.evaluate().setHeight(1000).setWidth(1000);
  const ui = SpreadsheetApp.getUi();
  ui.showModalDialog(htmlOutput, 'Preview emails');
}
First we create an HTML template using our preview.html file. We then create an HTML output using the evaluate() method, and set the desired width and height. We get the UI and use showModalDialog() to render it, passing in the HTML output and the title of the popup.
Go ahead and run the function in Apps Script. The spreadsheet will render the popup.
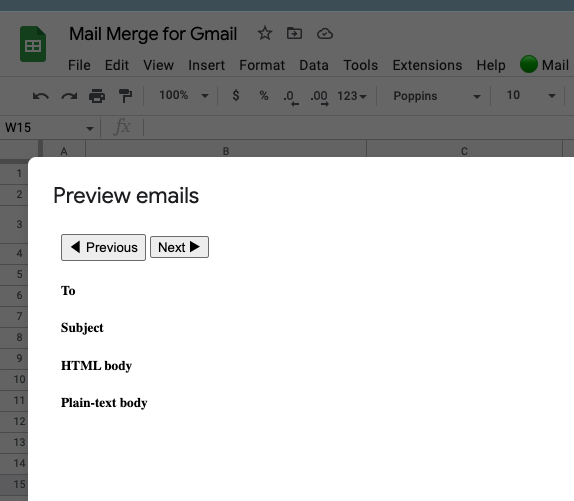
The popup shows up with the title and the headers of our divs. We can make it look better with CSS styling. In Apps Script we typically save the CSS in a separate file and use an include() function to pull it into the HTML, but we'll leave that to a future post. For now, include the following styling one line above the </head> tag.
<style>
    body {
      font-family: sans-serif, Arial;
      color: #333333;
    }
    button {
      border: none;
      background-color: #8c98ff;
      padding: 5px 7px;
      min-width: 70px;
      min-height: 30px;
      cursor: pointer;
    }
    #to,
    #subject {
      border: 1px solid #cccccc;
      width: 92%;
      height: 16px;
      padding: 5px;
    }
    #html-body,
    #plain-text-body {
      border: 1px solid #cccccc;
      padding: 5px;
      overflow: scroll;
    }
    #buttons {
      margin-bottom: 10px;
    }
    .double {
      display: flex;
      align-items: center;
      justify-content: space-between;
    }
</style>
At this point the popup shows up on command and is styled. You can create a insert a drawing of a button into the sheet, right click the drawing, click the three dots, select "Assign script," type in: previewEmails, and click "Save." Now the popup will appear whenever you click on the button drawing.
But the popup is empty. We need to bring data from the server, and use client-side Javascript in the HTML to populate the popup. Let's do the latter first. Right above the </body> tag, enter the following code:
<script>
  const data = <?!= emails ?>;
  let position = 0;

  function populatePreview() {
    if (position < 0) {
      position = data.length - 1;
    }
    if (position > data.length - 1) {
      position = 0;
    }
    document.querySelector('#to').innerText = data[position].to;
    document.querySelector('#subject').innerText = data[position].subject;
    document.querySelector('#html-body').innerHTML = data[position].htmlBody;
    document.querySelector('#plain-text-body').innerText =
      data[position].plainBody;
  }

  document
    .querySelector('#previous')
    .addEventListener('click', function (e) {
      position--;
      populatePreview();
    });

  document.querySelector('#next').addEventListener('click', function (e) {
    position++;
    populatePreview();
  });

  populatePreview();
</script>
Above we first define a data variable that will include the data from the server. Apps script uses scriptlets in the form of <?!= ?> to inject server-side code into the HTML. The emails variable points to an array of objects that represents the emails.
The position variable will determine which email to show-case in the popup.
the populatePreview function inserts the text from the emails array into the DIVs in the popup. The function also doesn't let position to get out of bounds: if the user clicks next beyond the length of the data then position will be set to zero and vise versa.
We then have the two event listeners for our buttons, changing the position and calling the populatePreview function.
Finally, we call the function to populate the popup with the first email.
If you try to display the popup now, it will come up empty and the buttons won't work. That's because we haven't passed the data from the server. Let's take care of that. Back in popup.gs, we will add code to our previewEmails() function:
function previewEmails() {
  const htmlTemplate = HtmlService.createTemplateFromFile('preview.html');
  const emails = prepareEmails();
  if (!emails) {
    return;
  }
  htmlTemplate.emails = JSON.stringify(emails.slice(0, 5));
  const htmlOutput = htmlTemplate.evaluate().setHeight(1000).setWidth(1000);
  const ui = SpreadsheetApp.getUi();
  ui.showModalDialog(htmlOutput, 'Preview emails');
}
We now have a new emails variable that will be populated by the emails data. We also have an if condition to stop execution of the function if there is no data. This can happen when the user clicks on the preview button without first selecting a template from the dropdown.
Add the following code for the prepareEmails() function:
function prepareEmails() {
  const emails = [];
  // Get the template contents
  const templateName = g.ss
    .getSheetByName(g.adminSheetName)
    .getRange(g.dropdownRange)
    .getValue();
  if (templateName.toString().trim().length === 0) {
    notifyUser_('Select an email template');
    return;
  }
  // Create a query to look for a template with the given name inside
  // the templates folder
  const query = `"${g.templatesFolderId}" in parents and title = "${templateName}"`;
  // Get the template file corresponding with the given name
  const file = DriveApp.searchFiles(query).next();
  // Open the document using the file's ID
  const doc = DocumentApp.openById(file.getId());
  // Get the document's body
  const body = doc.getBody();
  // Get the list of tables inside the body
  const tables = body.getTables();
  // Assign each table to the global variable's keys
  [g.subject, g.htmlBody, g.body] = tables.map((table) => table.getText());
  // Get the recipients' data
  const sh = g.ss.getSheetByName(g.dataSheetName);
  let [headers, ...data] = sh.getDataRange().getValues();
  data = data.filter((row) => row[0].toString().trim().length > 0);
  // Create and send a personalized message to each recipient
  data.forEach((row) => {
    // Copy the subject, HTML body and text body
    let subject = g.subject;
    let htmlBody = g.htmlBody;
    let plainBody = g.body;
    let to;
    headers.forEach((header, i) => {
      // Personalize the message components
      // using the recipient's data
      const re = new RegExp(`{{${header}}}`, 'g');
      subject = subject.replace(re, row[i]);
      plainBody = plainBody.replace(re, row[i]);
      htmlBody = htmlBody.replace(re, row[i]);
      if (header === 'email') {
        to = row[i];
      }
    });
    emails.push({ to, subject, htmlBody, plainBody });
  });
  return emails;
}
The function relies on a global g object that we discussed in previous posts. Here it is again for your convenience:
const g = {
  templatesFolderId: 'the-id-of-your-templates-folder',
  adminSheetName: 'Admin',
  dataSheetName: 'Registrations',
  dropdownRange: 'B3',
  messageRange: 'B4',
  ss: SpreadsheetApp.getActive(),
};
Essentially, prepareEmails() takes the template that the user selected in the dropdown, the data of the recipients, and then it creates an array of objects, each one representing the personalized email for every recipient. the previewEmails() function uses this line to attach the emails array to the HTML template: htmlTemplate.emails = JSON.stringify(emails.slice(0, 5));. It takes the first five emails from the array, stringifies them, and attaches them to the htmlTemplate. Since the property "emails" matches the "emails" in const data = <?!= emails ?>;, Apps Script will print the array – without an escaping – to the HTML page, as if we manually entered it there. This is a convenient way to pass data from the server to the HTML.
That's all there is to it. If you launch the popup now, you can iterate through the recipients. You can close the preview, make changes in the Google Doc template, and when you hit preview again, you should see those changes reflected in the subject or bodies fo the emails.